OldSiteResourcesQuake2TutorialsNglv
Contents
NPherno's GL Viewer
by rogue13
Tools needed for this program
Npherno's GL viewer
A Quake 2 model
A video card with good Open GL support
Skins to put on the model
Time and patience
Overview
This is to be a help file / tutorial / read me text for the GL viewer. This viewer is pure GL. It will not run on sub standard cards, nor will it run on 3DFX based cards that use the proprietary Glide drivers. It needs to be the real thing.
If your running a TNT based card, you are set. That's what it was built and tested on, both in Win 98 and NT4. Other cards may or may not be able to provide the proper platform. Next is a list of cards that we know of after beta testing, if you have another type and have success or not, we'd love to hear about it to add to the list here:
- TNT
- Permedia2
- i740
- Voodoo 1/2
- G200
So now you're asking me "What is this thing and why should I use it?" Well that's understandable, plenty of people use Skinview and find this sort of thing useless. Fine, this app is about creating some excellent views of your model with colored lighting and a 4 pass rendering system. Yep, that means four skins per model. This is what id has say will be available to us for Quake3 models. If it doesn't happen for Q3, it is somewhat already part of Half Life, which does offer specularity texture maps for the models. So you can sort of "practice" now plus getting some superb images for your models which is always an excellent thing.
The Installation
1. Unzip the two files into a directory. How about "c:\NGLV"
2. Make an icon for yourself in the appropriate spot, I chose my desktop.
3. Double click on the icon of love and you're in.
Using the Viewer
On this first edition of the readme for the viewer, I'm basically going to call out what everything is and then refine later.
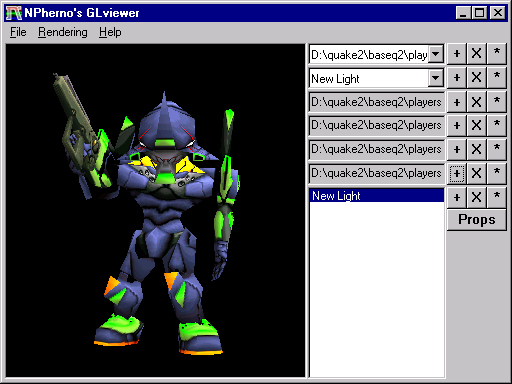
I also suggest you get at least the [../../../models2/unit01.htm Unit01 model] that is shown above as it was released with all 4 skins in .bmp format already. The other two Unit models 00 and 02 were not released with the GLV skins, but they were made. Here's a link to get them separately if you already have those models and would like to test the viewer with more that just one model.
- LGT Transfer
- Exit
- Texture
- Multipass
- Background color
- Wireframe
- Environment Map
- Help
- Setup
- Models
- Lights
- Texture
- Specularity
- Diffuse
- Glow
- Props
- Left Mouse Button
- Right Mouse Button
- Shift
- Crtl
- Left and Right Arrow Buttons
- Regular models and skins
- Multiple Lights
