Normal Map Technical Details
Normal maps can be improved greatly by learning the implementation details.
Contents
Synched Workflow
To eliminate seams and shading artifacts, the game engine and the normal map baking tool should use the same tangent basis.
When you export a model from your baking tool, it is best to choose a format like FBX which can store the tangents. Some games use this data to synch the normal maps to their renderer, so you get seamless shading.
| Renderer | Normal map baker |
|---|---|
| 3ds Max | 3ds Max, Handplane, ? |
| Blender | ? |
| Creation Engine | Handplane, ? |
| CryEngine | ? |
| Knald | ? |
| Marmoset Toolbag | 3ds Max, Maya, Xnormal, ? |
| Maya | Handplane, Maya, ? |
| Source | Handplane, Maya ([1]), ? |
| Starcraft II | Handplane, ? |
| Substance Designer | ? |
| Unity([2], [3]) | Handplane, Xnormal (via Asset Store), ? |
| Unreal Engine 4 | Handplane, Xnormal([4]), ? |
| Xnormal | Xnormal, ? |
(... the following is out of date, incorrect ...)
== Shaders and Seams ==
You need to use the right kind of shader to avoid seeing seams where UV breaks occur. It must be written to use the same [[#TangentBasis|tangent basis]] that was used during baking. If the shader doesn't, the lighting will either be inconsistent across UV borders or it will show smoothing errors from the low-poly vertex normals.

Xnormal generates accurate normals when displayed in Xnormal, and the SDK includes a method to write your own custom tangent space generator for the tool.

<span id="3MS"></span>
=== 3ds Max Shaders ===
The "Render To Texture" tool in 3ds Max 2011 and older generates [[#TSNM|tangent-space]] normal maps that render correctly in the offline renderer (scanline) but do not render correctly in the realtime viewport with the 3ds Max shaders. Max is using a different [[#TangentBasis|tangent basis]] for each. This is readily apparent when creating non-organic hard surface normalmaps; smoothing errors appear in the viewport that do not appear when rendered.

The errors can be fixed by using "Render To Texture" to bake a [[#TSNM|tangent-space]] or [[#OSNM|object-space]] map, and using the free [http://www.3pointstudios.com/3pointshader_about.shtml "3Point Shader"] by Christoph '[[CrazyButcher]]' Kubisch and Per 'perna' Abrahamsen. The shader uses the same tangent basis as the baking tool, so it produces nearly flawless results. It also works with old bakes.

You can get OK results in the Max viewport using a tangent-space map baked in Maya, loading it in a Standard material, and enabling "Show Hardware Map in Viewport". Another method is to use Render To Texture to bake an [[#OSNM|object-space]] map then use [[#CBS|Nspace]] to convert it into a tangent-space map then load that in a DirectX material and use the RTTNormalMap.fx shader.

Autodesk is aware of these issues, and plans to address them in an upcoming release. See these links for more information:
* Christoph "[[CrazyButcher]]" Kubisch and Per "perna" Abrahamsen designed a shader/modifier combination approach that fixes the viewport problem, see the Polycount forum post [http://boards.polycount.net/showthread.php?t=72861 3Point Shader Lite - Shader material editor and Quality Mode normalmaps for 3ds Max].
* Jean-Francois "jfyelle" Yelle, Autodesk Media & Entertainment Technical Product Manager, has [http://boards.polycount.net/showthread.php?p=1115812#post1115812 this post].
* Ben Cloward posted [http://boards.polycount.net/showthread.php?p=1100270#post1100270 workarounds and FX code].
* Christopher "cdiggins" Diggins, SDK writer for 3ds Max, shares some of the SDK code in his blog posts "[http://area.autodesk.com/blogs/chris/how_the_3ds_max_scanline_renderer_computes_tangent_and_binormal_vectors_for_normal_mapping How the 3ds Max Scanline Renderer Computes Tangent and Binormal Vectors for Normal Mapping]" and "[http://area.autodesk.com/blogs/chris/3ds_max_normal_map_baking_and_face_angle_weighting_the_plot_thickens 3ds Max Normal Map Baking and Face Angle Weighting: The Plot Thickens]".

[[image:nmtest_uv-splits_thumb.jpg|thumb|600px|none|Comparison of map baking methods in Maya and Max, and Ben Cloward's custom FX code.<br>Image by [http://www.bencloward.com/ Ben Cloward] and [http://www.linkedin.com/in/ericchadwick Eric Chadwick]]]

[[image:normalmapfix_3pointstudios_thumb.jpg|frame|none|3 Point Studios' normal map display fix for 3ds Max.<br>image by [http://www.3pointstudios.com 3 Point Studios]]]

{|class="wikitable"
|[[image:max2010_normalmap_workarounds.png|thumb|400px|none|]]
|[[image:max2010_normalmap_compare.png|thumb|400px|none|]]
|-
|Viewport methods in 3ds Max 2010.<br>Image by [http://www.linkedin.com/in/ericchadwick Eric Chadwick]
|More baking methods in 3ds Max 2010.<br> Image by [http://www.linkedin.com/in/ericchadwick Eric Chadwick]
|}

<span id="3MENT"></span>

=== 3ds Max Edit Normals Trick ===
After baking, if you add an Edit Normals modifier to your low-poly normalmapped model, this seems to "relax" the vertex normals for more accurate viewport shading. The modifier can be collapsed if desired.

<span id="MS"></span>
=== Maya Shaders ===
Maya seems to correctly generate normals to view in realtime, with the correct [[#TangentBasis|tangent basis]], with much less smoothing errors than 3ds Max.
* [http://www.mentalwarp.com/~brice/shader.php BRDF shader] by [http://www.mentalwarp.com/~brice/ Brice Vandemoortele] and [http://www.kjapi.com/ Cedric Caillaud] (more info in [http://boards.polycount.net/showthread.php?t=49920 this Polycount thread]) '''Update:''' [http://boards.polycount.net/showthread.php?p=821862#post821862 New version here] with many updates, including object-space normal maps, relief mapping, self-shadowing, etc. Make sure you enable cgFX shaders in the Maya plugin manager, then you can create them in the same way you create a Lambert, Phong etc. Switch OFF high quality rendering in the viewports to see them correctly too.
* If you want to use the software renderer, use mental ray instead of Maya's software renderer because mental ray correctly interprets tangent space normals. The Maya renderer treats the normal map as a grayscale bump map, giving nasty results. Mental ray supports Maya's Phong shader just fine (amongst others), although it won't recognise a gloss map plugged into the "cosine power" slot. The slider still works though, if you don't mind having a uniform value for gloss. Spec maps work fine though. Just use the same set up as you would for viewport rendering. You'll need to have your textures saved as TGAs or similar for mental ray to work though. - from [http://boards.polycount.net/member.php?u=14235 CheeseOnToast]
Tangent-Space vs. Object-Space
Normal maps can be made in either of two basic flavors: tangent-space or object-space. World-space is basically the same as object-space, except it requires the model to remain in its original orientation, neither rotating nor deforming, so it's almost never used.
Tangent-space normal map
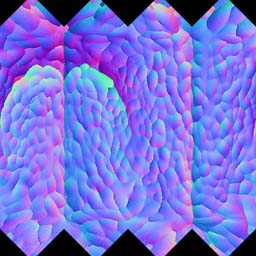
Image by Eric Chadwick.
Predominantly-blue colors. Object can rotate and deform. Good for deforming meshes, like characters, animals, flags, etc.
Pros:
- Maps can be reused easily, like on differently-shaped meshes.
- Maps can be tiled and mirrored easily, though some games might not support mirroring very well.
- Easier to overlay painted details.
- Easier to use image compression.
Cons:
- More difficult to avoid smoothing problems from the low-poly vertex normals (see Smoothing Groups and Hard Edges).
- Slightly slower performance than an object-space map (but not by much).
Object-space normal map
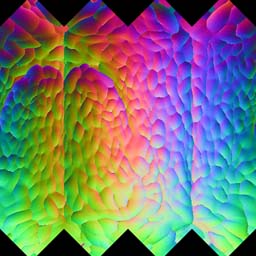
Image by Eric Chadwick.
Rainbow colors. Objects can rotate, but usually shouldn't be deformed, unless the shader has been modified to support deformation. Object-space is also called local-space or model-space.
Pros:
- Easier to generate high-quality curvature because it completely ignores the crude smoothing of the low-poly vertex normals.
- Slightly better performance than a tangent-space map (but not by much).
Cons:
- Can't easily reuse maps, different mesh shapes require unique maps.
- Difficult to tile properly, and mirroring requires specific shader support.
- Harder to overlay painted details because the base colors vary across the surface of the mesh. Painted details must be converted into Object Space to be combined properly with the OS map.
- They don't compress very well, since the blue channel can't be recreated in the shader like with tangent-space maps. Also the three color channels contain very different data which doesn't compress well, creating many artifacts. Using a half-resolution object-space map is one option.
Converting Between Spaces
Normal maps can be converted between object space and tangent space, in order to use them with different blending tools and shaders, which require one type or the other.
Object space maps can also be converted to maps with different tangent bases, to better match the normal maps with the renderer and thus avoid lighting errors.
- Handplane by Luke Hodorowicz and Alec Moody is a tool that converts object space maps into a variety of tangent spaces: 3ds Max, Creation Engine, Maya, Source, Unity, Unreal, etc. See the Polycount Forum thread Official handplane support thread - Now freeware!!.
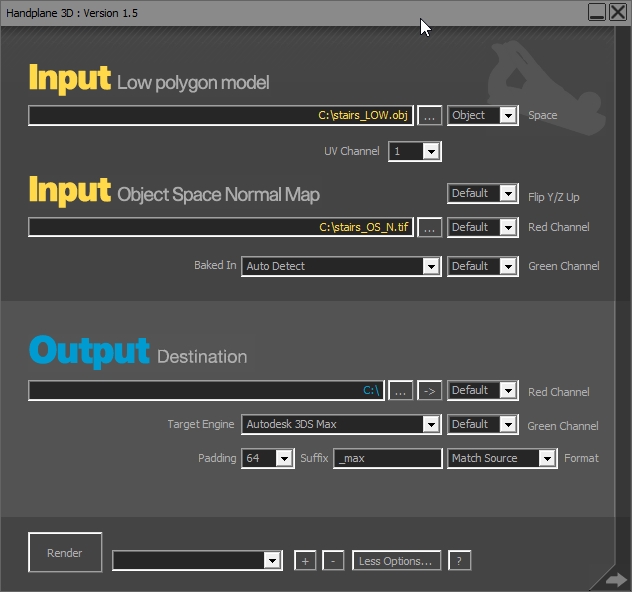
Image by Alec Moody.
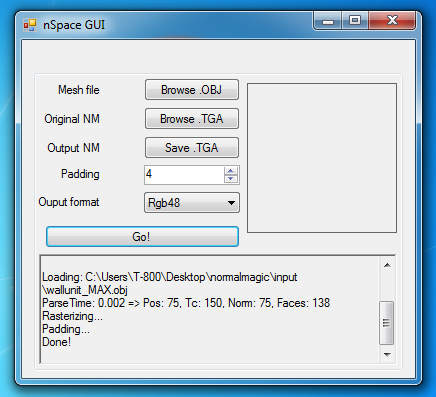
- NSpace by Diogo "fozi" Teixeira is a tool that converts an object-space normal map into a tangent-space map, which then works seamlessly in the 3ds Max viewport. He converts the map by using the same tangent basis that 3ds Max uses for its hardware shader. To see the results, load the converted map via the Normal Bump map and enable "Show Hardware Map in Viewport". Osman "osman" Tsjardiwal created a GUI for NSpace, you can download it here, just put it in the same folder as the NSpace exe and run it.
Joe "EarthQuake" Wilson said: "[8Monkey Labs has] a tool that lets you load up your reference mesh and object space map. Then load up your tangent normals, and adjust some sliders for things like tile and amount. We need to load up a mesh to know how to correctly orient the tangent normals or else things will come out upside down or reverse etc. It mostly works, but it tends to "bend" the resulting normals, so you gotta split the mesh up into some smoothing groups before you run it, and then I usually will just composite this "combo" texture over my orig map in Photoshop."
RGB Channels
Shaders can use different techniques to render tangent-space normal maps, but the normal map directions are usually consistent within a game. Usually the red channel of a tangent-space normal map stores the X axis (pointing the normals predominantly leftwards or rightwards), the green channel stores the Y axis (pointing the normals predominantly upwards or downwards), and the blue channel stores the Z axis (pointing the normals outwards away from the surface).
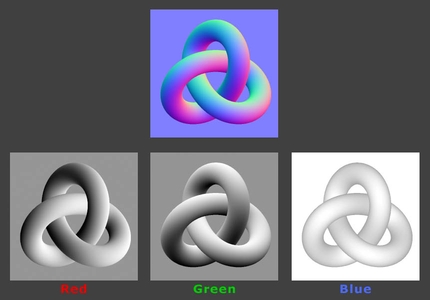
Image by Eric Chadwick.
If you see lighting coming from the wrong angle when you're looking at your normal-mapped model, and the model is using a tangent-space normal map, the normal map shader might be expecting the red or green channel (or both) to point in the opposite direction. To fix this either change the shader, or simply invert the appropriate color channels in an image editor, so that the black pixels become white and the white pixels become black.
Some shaders expect the color channels to be swapped or re-arranged to work with a particular compression format. For example the DXT5_nm format usually expects the X axis to be in the alpha channel, the Y axis to be in the green channel, and the red and blue channels to be empty.
Tangent Basis
Tangent-space normal maps use a special kind of vertex data called the tangent basis. This is similar to UV coordinates except it provides directionality across the surface, it forms a surface-relative coordinate system for the per-pixel normals stored in the normal map. This coordinate system is required to light a normal mapped surface.
Each vertex in the tangent basis is a combination of three things: the mesh vertex's normal (influenced by smoothing), the vertex's tangent (usually derived from the V texture coordinate), and the vertex's bitangent (derived in code, also called the binormal). These three vectors create an axis for each vertex, giving it a specific orientation in the tangent space. These axes are used to properly transform the incoming lighting from world space into tangent space, so your normal-mapped model will be lit correctly.
Light rays are in world space, but the normals stored in the normal map are in tangent space. When the model is being rendered, the light rays must be converted from world space into tangent space, using the tangent basis to get there. At that point the incoming light rays are compared against the directions of the normals in the normal map, and this determines how much each pixel is going to be lit. Alternatively, instead of converting the light rays some shaders will convert the normals in the normal map from tangent space into world space. Then those world-space normals are compared against the light rays, and the model is lit appropriately. The method depends on who wrote the shader, but the end result is the same. Both methods require a tangent basis to transform the lighting.
When a triangle's vertex normals are pointing straight out, and a pixel in the normal map is neutral blue (128,128,255) this means the pixel's normal will be pointing straight out from the surface of the low-poly mesh. When that pixel normal is tilted towards the left or the right in the tangent coordinate space, it will get either more or less red color, depending on whether the normal map is set to store the X axis as either a positive or a negative value. Same goes for when the normal is tilted up or down in tangent space, it will either get more or less green color. If the vertex normals aren't exactly perpendicular to the triangle, the normal map pixels will be tinted away from neutral blue as well.
Unfortunately for artists, there are many different ways to calculate the tangent basis: 3ds Max, Maya, DirectX 9, NVMeshMender, Eric Lengyel, a custom solution, etc. This means a normal map baked in one application probably won't shade correctly in another. Artists must do some testing with different baking tools to find which works best with their output. When the renderer (or game engine) renders your game model, the shader must use the same tangent basis as the normal map baker, otherwise you'll get incorrect lighting, especially across the seams between UV shells.
The xNormal SDK supports custom tangent basis methods. When a programmer uses it to implement their renderer's own tangent basis, artists can then use Xnormal to bake normal maps that will match their renderer perfectly.
UV Coordinates
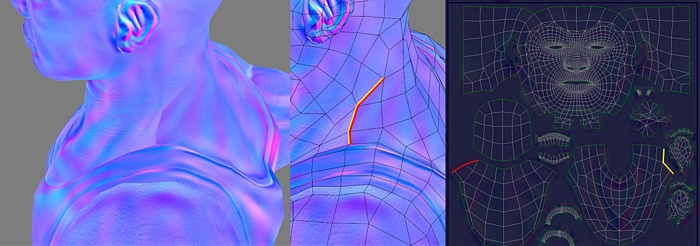
Image by Eric Chadwick.
When you look at a tangent-space normal map for a character, you typically see different colors along the UV seams. This is because the UV shells are often oriented at different angles on the mesh, a necessary evil when translating the 3D mesh into 2D textures. The body might be mapped with a vertical shell, and the arm mapped with a horizontal one. This requires the normals in the normal map to be twisted for the different orientations of those UV shells. The UVs are twisted, so the normals must be twisted in order to compensate. The tangent basis helps reorient (twist) the lighting as it comes into the surface's local space, so the lighting will then look uniform across the normal mapped mesh.
When an artist tiles a tangent-space normal map across an arbitrary mesh, like a landscape, this tends to shade correctly because the mesh has a uniform direction in tangent space. If the mesh has discontinuous UV coordinates (UV seams), or the normal map has large directional gradients across it, the tangent space won't be uniform anymore so the surface will probably have shading seams.
Common Swizzle Coordinates
3D Software capable of displaying tangent space normal maps will have a native required direction, or "handedness" for the RGB channels in a normal map, sometimes referred to as "Swizzle Coordinates," though shaders can often be written to override this native handedness. You may hear developers refer to "flipping the green channel" in order to get a normal map to display correctly, and this simply indicates that when the normal map was baked, it was authored with the incorrect handedness in the green channel. Left/Down handedness is indicated with a negative (-), and right/up handedness is demarcated with a (+) positive.
| Software | Red | Green | Blue |
| 3ds Max | X+ | Y- | Z+ |
| Blender | X+ | Y+ | Z+ |
| CryENGINE | X+ | Y- | Z+ |
| Maya | X+ | Y+ | Z+ |
| Modo | X+ | Y+ | Z+ |
| Source | X+ | Y- | Z+ |
| Toolbag | X+ | Y+ | Z+ |
| Unity | X+ | Y+ | Z+ |
| Unreal Engine | X+ | Y- | Z+ |
