Texture Baking
Texture baking is the process of transferring details from one model to another.
The baking tool starts a certain distance out from the model (usually a low-resolution model for game use), and casts rays inwards towards another model (usually a high-resolution sculpt). When a ray intersects the 2nd model, it records the surface detail and saves that into a texture map, using the first model's Texture Coordinates.
Baking tools support multiple map types. High-resolution normals go into a Normal map, occlusion goes into an Ambient occlusion map, etc.
Contents
Baking Workflow
The baking workflow varies for each artist; this is a summary of common baking tasks.
- Blockout model:
- Create a rough low- to medium-resolution model, and get it into the game.
- Test with all the required functionality so you can determine how much detail is required.
- High-resolution model:
- Build the source for your normal map, using DigitalSculpting and/or Subdivision Surface Modeling.
- High-quality bakes require specific modeling techniques, see Normal Map Modeling.
- Low-poly in-game model:
- Remove details from the base version of the high-poly model, or use ReTopologyModeling.
- Create good topology for baking. See Normal_Map_Modeling#Low-Poly_Mesh and Understanding averaged normals and ray projection/Who put waviness in my normal map? and Skew you buddy! Making sense of skewed normal map details.
- Create good topology for animation. See Topology#Principles_of_Topology.
- UV coordinates:
- Create good Texture Coordinates for your low-poly model.
- For tangent-space normal mapping, split the UVs for every hard edge (where vertex normals are split, or different smoothing groups are used, same thing). See You're making me hard. Making sense of hard edges, uvs, normal maps and vertex counts, and Earthquake on separating smoothing groups in the UV.
- Make sure there's enough room between UVs for good edge padding to prevent color bleeding between the UVs.
- Triangulate:
- See Texture Baking#Triangulation, and Polygon Count#Polygons Vs. Triangles.
- Triangulate before mirroring, to prevent shading errors.
- Mirror & duplicate:
- If creating symmetrical parts, mirror the model. See Normal Map Modeling#Mirroring.
- Duplicate any model parts which reuse the same UV; this ensures perfect UV overlap.
- Offset UVs:
- Optimize the high-poly.
- Optimize the high-resolution model to speed up bakes, to avoid running out of RAM while baking, and to keep 3d file sizes manageable. See Tools#Decimation_Software.
- If it's a sculpt reduce the vertex count to a manageable file size before exporting. Sculpting tools like Zbrush create triangles smaller than the bake pixels, which will increase baking time significantly without actually improving the bake.
- If it's a subdivision surface choose an appropriate resolution. Use just enough subdivisions to get a smooth surface at the baking resolution, and no more.
- Explode.
- The reason: Interpenetrating or close-together parts can cause baking artifacts, because neighboring surfaces will capture parts of each other, see Texture Baking#Solving Intersections.
- To explode means to separate the non-welded surfaces, mesh elements, Zbrush subtools, etc. so there is ample space between them. Use the same separation for the highpoly model and the lowpoly model. After the bake, move the pieces back together.
- The workflow: If the modeling software has animation, you can keyframe the explode to easily reverse it after baking. Tools are also available, see Explode script needed (for baking purposes). Elements can be tagged by some baking tools, so specific low-poly elements will only bake related high-poly elements, this avoids exploding (3ds Max can use Material IDs, etc.).
- Note: Some baking tools avoid the need for exploding the meshes. 3ds Max has Hit Only Matching Material ID, Marmoset Toolbag has Bake Groups, Substance 3D Painter has Match by Name.
- Cage.
- Create an inflated copy of the low-resolution model, which encompasses the high-resolution model. See Texture Baking#Cages. Some tools create this automatically.
- Which baker?
- Test Bakes.
- Import the high-resolution model, the low-resolution model, and the cage.
- Test the bake settings using lower values for faster iteration. Smaller render sizes, lower anti-aliasing samples, etc.
- Use enough edge padding to prevent color bleeding between the UVs.
- Fix errors and re-bake until solved. Look for overlaps, gaps, skewed details. Adjust the bake settings, low-poly model, cage, etc. See Skew you buddy! Making sense of skewed normal map details., and Skewmesh Tutorial.
- Some errors can be painted out later, but avoid this! Any painting must be repeated if the model is re-baked, and painting on a normal map can introduce more artifacts.
- Render.
- Increase the settings to full quality.
- Use anti-aliasing or super-sampling. See Texture Baking#Anti-Aliasing.
- Use 16-bit. See Of Bit Depths, Banding and Normal Maps.
- Use object space, if converting to a specific tangent space. See Synched Workflow, and Converting Between Spaces.
- Convert.
- Convert to a specific tangent space. See Synched Workflow, and Converting Between Spaces.
- Edit.
- Combine bakes if needed. See Ambient occlusion map#EarthQuake's Baking Method
- Add details from photos or other bakes. See RNM Normal Map Combiner, and Combine Normal.
- Some errors can be painted out, but avoid this! Any painting must be repeated if the model is re-baked, and painting on a normal map can introduce more artifacts.
- Swizzle. See Normal Map Technical Details#Common Swizzle Coordinates.
- Re-normalize. See Normal_map#Re-normalizing.
- Reduce to 8-bit. See Of Bit Depths, Banding and Normal Maps.
- View & Check.
- View the finished in-game model and textures in your game engine, and check for errors.
UV Coordinates
Normal map baking tools only capture details within the 0-1 UV square, any UV bits outside this area are ignored.
Only one copy of the forward-facing UVs should remain in the 0-1 UV square at baking time. If the mesh uses overlapping UVs, this will likely cause artifacts to appear in the baked map, since the baker will try render each UV shell into the map. Before baking, it's best to move all the overlaps and mirrored parts outside the 0-1 square.
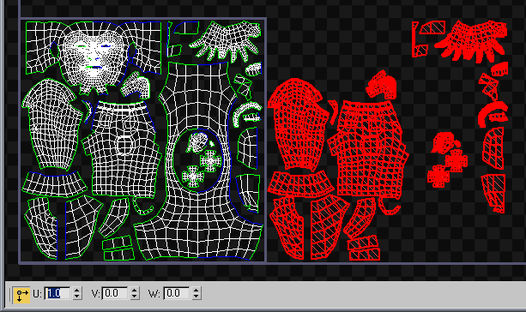
Mirrored UVs (in red) are offset 1 unit before baking.
Image by Eric Chadwick.

If you move all the overlaps and mirrored bits exactly 1 UV unit (any whole number will do), then you can leave them there after the bake and they will still be mapped correctly. You can move them back if you want, it doesn't matter to most game engines. Be aware that ZBrush does use UV offsets to manage mesh visibility, however this usually doesn't matter because the ZBrush cage mesh is often a different mesh than the in-game mesh used for baking.
You should avoid changing the UVs after baking the normal map, because rotating or mirroring UVs after baking will cause the normal map not to match the tangent basis anymore, which will likely cause lighting problems.
In 3ds Max, W is a third texture coordinate. It's used for 3D procedural textures and for storing vertex color in UV channels (you need 3 axes for RGB, so UVW can store vertex color). Bake problems can be avoided by moving any overlapping UVs to -1 on the W axis, with the same results as moving them 1 unit on the U or V axes. The tool Render To Texture will always bake whatever UVs are the highest along the W axis. However using W can be messy... it's generally hidden unless you purposefully look for it (bad for team work), doesn't get preserved on export to other apps, and high W values can prevent selecting and/or welding UVs.
If you're using tiled normal maps, then overlaps and mirroring shouldn't matter. Make sure to test in your game engine to be sure, but tiling allows a lot more reuse than a unique-UV layout.
Tangent Basis

Image by Eric Chadwick.
When you look at a tangent-space normal map for a character, you typically see different colors along the UV seams. This is because the UV shells are often oriented at different angles on the mesh, a necessary evil when translating the 3D mesh into 2D textures. The body might be mapped with a vertical shell, and the arm mapped with a horizontal one. This requires the normals in the normal map to be twisted for the different orientations of those UV shells. The UVs are twisted, so the normals must be twisted in order to compensate. The tangent basis helps reorient (twist) the lighting as it comes into the surface's local space, so the lighting will then look uniform across the normal mapped mesh.
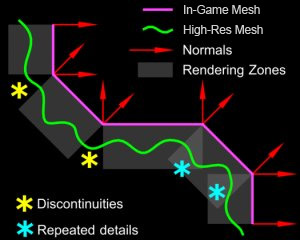
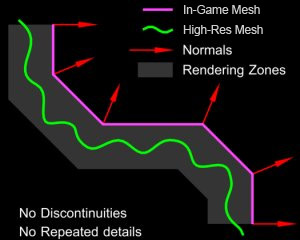
When an artist tiles a tangent-space normal map across an arbitrary mesh, like a landscape, this tends to shade correctly because the mesh has a uniform direction in tangent space. If the mesh has discontinuous UV coordinates (UV seams), or the normal map has large directional gradients across it, the tangent space won't be uniform anymore so the surface will probably have shading seams.
Triangulation
Before baking, it is usually best to triangulate the low-poly model, converting it from polygons into pure triangles. This prevents the vertex normals from being changed later on, which can create specular artifacts.
Sometimes a baking tool or a mesh exporter/importer will re-triangulate the polygons. A quad polygon is actually treated as two triangles, and the internal edge between them is often switched diagonally during modeling operations. When the vertices of the quad are moved around in certain shapes, the software's algorithm for polygon models tries to keep the quad surface in a "rational" non-overlapping shape. It does this by switching the internal edge between its triangles.
If the model is mirrored, make sure the triangulation is mirrored as well. If not, this will cause shading errors because only one side will match the original bake.
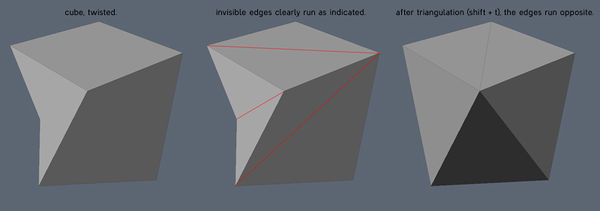
When quads are triangulated in Modo, the internal edges are sometimes flipped, which causes shading differences. Image by James "Talon" O'Hare.
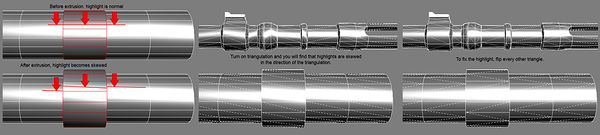
The specular highlight is affected by triangulation. Flip edges to fix skewing. See the Polycount thread Skewed Specular Highlight? for pictures and more info. Image by Robert "TychoVII" Kreps.
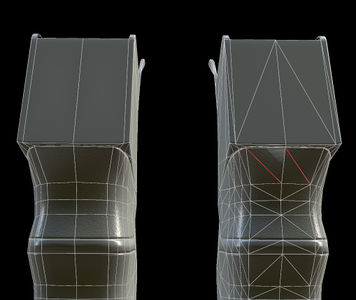
Non-mirrored triangles cause a shading error. Image by Orlando Jones.


Cages
Cage has two meanings in the normal-mapping process: a low-poly base for Subdivision Surface Modeling (usually called the BaseMesh), or a ray-casting mesh used for normal map baking. This section covers the ray-casting cage.
Most normal map baking tools allow you to use a distance-based raycast. A ray is sent outwards along each vertex normal, then at the distance you set a ray is cast back inwards. Where ever that ray intersects the high poly mesh, it will sample the normals from it.
Hard edges and a distance-based raycast (gray areas) cause ray misses (yellow) and ray overlaps (cyan). Image by Diego Castaño.
The gray area shows that using all soft edges (or hard edges and a cage-based raycast) will avoid ray-casting errors from split normals. Image by Diego Castaño.


Unfortunately with a distance-based raycast, split vertex normals will cause the bake to miss parts of the high-res mesh, causing errors and seams.
Some software allows you to use cage mesh option instead, which basically inflates a copy of the low-poly mesh, then raycasts inwards from each vertex. This ballooned-out mesh is the cage.
In 3ds Max the cage controls both the distance and the direction of the raycasting.
In Maya the cage only controls the distance; the ray direction matches the vertex normals (inverted).
- The tutorial 3DTutorials/Modeling High-Low Poly Models for Next Gen Games by João "Masakari" Costa has more examples of ray-casting, plus how to get better results from the bake.
Anti-Aliasing
Aliasing errors can occur both during the bake (from overlaps in the high-poly model) and in-game (from overlaps in the low-poly model).
Contiguous low-poly meshes are better in general, as long as the triangle budget allows it. Otherwise interior parts will be aliased in-game where the edges overlap one another. See Normal Map Modeling#Contiguous Meshes.
For the high-poly model, turning on super-sampling or anti-aliasing (or whatever multi-ray casting is called in your normal map baking tool) will help to fix any jagged edges where the high-poly model overlaps itself within the UV borders of the low-poly mesh, or wherever the background shows through holes in the mesh. Unfortunately this tends to render much much slower, and takes more memory.

Image by 'knak47'
One trick to speed this up is to render 2x the intended image size then scale the normal map down 1/2 in a paint program like Photoshop. The reduction's pixel resampling will add anti-aliasing for you in a very quick process. After scaling, make sure to re-normalize the map if your game doesn't do that already, because the un-normalized pixels in your normalmap may cause pixelly artifacts in your specular highlights. Re-normalizing can be done with NVIDIA's normal map filter for Photoshop.
3ds Max's supersampling doesn't work nicely with edge padding, it produces dark streaks in the padded pixels. If so then turn off padding and re-do the padding later, either by re-baking without supersampling or by using a Photoshop filter like the one that comes with Xnormal.
Transparency
Sometimes you need to bake a normal map from an object that uses opacity maps, like a branch with opacity-mapped leaves. Unfortunately baking apps often completely ignore any transparency mapping on your high-poly mesh.
3ds Max's RTT baker causes transparency errors. Image by Joe "EarthQuake" Wilson.
Use colored lighting to bake perfect transparency. Image by Joe "EarthQuake" Wilson.


To solve this, render a Top view of the mesh. This only works if you're using a planar UV projection for your low-poly mesh and you're baking a tangent-space normal map.
Make sure the Top view matches the dimensions of the planar UV projection used by the low-poly mesh. It helps to use an orthographic camera for precise placement.
On the high-poly mesh either use a specific lighting setup or a use special material shader:
- The lighting setup is described in these tutorials:
- Creating A Normal Map Right In Your 3D App by Ben Cloward
- Generating High Fidelity Normal Maps with 3-D Software by Dave McCoy, Graphics Techniques Consultant, Xbox Content and Design Team
- The material shader does the same thing, but doesn't require lights.
- NormalTexMap scripted map for 3ds Max by Dave Locke.
- InfoTexture map plugin for 3ds Max by John Burnett
The lighting setup for top-down rendering. Image by Ben Cloward.

Edge Padding
If a normal map doesn't have enough Edge Padding, this will create shading seams on the UV borders.
High Poly Materials
3ds Max will not bake a normal map properly if the high-res model has a mental ray Arch & Design material applied. If your normal map comes out mostly blank, either use a Standard material or none at all. For an example see the Polycount thread Render to Texture >:O.
Reset Transforms
Before baking, make sure your low-poly model's transforms have been reset. This is very important! Often during the modeling process a model will be rotated and scaled, but these compounded transforms can create a messy local "space" for the model, which in turn often creates rendering errors for normal maps.
In 3ds Max, use the Reset Xforms utility then Collapse the Modifier Stack. In Maya use Freeze Transformation. In XSI use the Freeze button.
Solving Intersections
The projection process often causes problems like misses, or overlaps, or intersections. It can be difficult generating a clean normal map in areas where the high-poly mesh intersects or nearly intersects itself, like in between the fingers of a hand. Setting the ray distance too large will make the baker pick the other finger as the source normal, while setting the ray distance too small will lead to problems at other places on the mesh where the distances between in-game mesh and high-poly mesh are greater.
Fortunately there are several methods for solving these problems. Listed in order by quality/speed:
Method 1: Create a contiguous low-poly mesh.
- This method avoids overlap baking errors, minimizes aliased edges in-game, and optimizes the Texture Coordinates.
- See Normal Map Modeling#Contiguous Meshes.
Method 2: Limit the projection to matching materials, or matching UVs.
- This method allows the use of the existing models, without requiring any major changes.
- AO may require two bakes.
- See the 3ds Max 2016 Help: Render to Texture: Projection Options Dialog.
Method 3: Explode the meshes.
- Takes more time to set up.
- AO may require [Ambient_occlusion_map#EarthQuake.27s_Baking_Method two bakes].
- See the Polycount Forum thread Explode script needed (for baking purposes).
- See Explode Tools.
Method 4: Bake two or more times using different cage sizes/distances, and combine the maps in Photoshop.
- it can take a lot of time to bake multiple maps, and to manually sort which elements to combine.
Method 5: Change the shape of the cage.
- Manually edit points on the projection cage to help solve tight bits like the gaps between fingers.
- This is initially quick, but it needs to be re-done every time the model is changed.
Explode Tools
- File:Explosivo 03.zip 3ds Max script by Benjamin "Electro" Darling
- Electro wrote: "Usage:
Name your low poly objects with the prefix LOW_
Name your high poly objects with the prefix HIGH_
Name your cage objects with the prefix CAGE_
The rest of the name following the prefixes needs to be identical. Currently this script works off of names alone, I didn't get to making anything kind of automated like I would if I were to take the time when making it again. I may look at revising this if there's enough demand for it. In general however, I think using the naming convention kind of forces people into good habits in being able to manage their scenes better... not that I would be enforcing that onto anyone ;)"
- File:MasterExploder.zip Maya python script by Sindre "Fingus" Skaare
- Fingus wrote: "The way it works is that it will match the object name, and sort between types using the suffix. This means that your lowpoly/highpoly/cage/blocker need to have the EXACT same name, and using the suffixes _lowpoly, _highpoly, _cage, and _blocker. If your highpoly consists of more parts than your lowpoly you can put the highpoly meshes in a group that has a name matching the lowpoly. When you run the script it will prompt you to input the amount of units you want to offset the meshes by. Also, it will key the meshes as gathered at frame 1 and exploded at frame 10. If you have existing keys or incoming connections it may cause problems."
Solving Pixel Artifacts

Image by Eric Chadwick
If you are using 3ds Max's Render To Texture to bake from one UV layout to another, you may see stray pixels scattered across the bake. This only happens if you are using a copy of the original mesh in the Projection, and that mesh is using a different UV channel than the original mesh.
There are two solutions for this:
- Add a Push modifier to the copied mesh, and set it to a low value like 0.01.
- or -
- Turn off Filter Maps in the render settings (Rendering menu > Render Setup > Renderer tab > uncheck Filter Maps). To prevent aliasing you may want to enable the Global Supersampler in Render Setup.
See also #Anti-Aliasing.
Solving Wavy Lines
When capturing from a cylindrical shape, often the differences between the low-poly mesh and the high-poly mesh will create a wavy edge in the normal map. There are a couple ways to avoid this:
- The best way... create your lowpoly model with better supporting edges. See the Polycount Forum threads Understanding averaged normals and ray projection/Who put waviness in my normal map?, approach to techy stuff, Any tips for normal mapping curved surface?.
- Bake an object-space map using more edges, then convert to tangent space using the original mesh and Handplane. See the Polycount thread Question about continuous meshes for low poly bakes.
- Adjust the shape of the cage to influence the directions the rays will be cast. Beware... this work will have to be re-done every time you edit the lowpoly mesh, as the cage will be invalidated. At the bottom of this page of his normal map tutorial, Ben "poopinmymouth" Mathis shows how to do this in 3ds Max. Same method can be seen in the image below.
- Subdivide the low-res mesh so it more closely matches the high-res mesh. Beware... this will cause the normal map not to match your lowpoly vertex normals, probably causing shading errors. Jeff "airbrush" Ross has a video tutorial that shows how to do this in Maya.
- Paint out the wavy line. Beware... this work will have to be re-done every time you re-bake the normal map. The normal map process tutorial by Ben "poopinmymouth" Mathis includes an example of painting out wavy lines in a baked normal map.
- Use a separate planar-projected mesh for the details that wrap around the barrel area, so the ray-casting is more even. Beware... this will cause the normal map not to match your lowpoly vertex normals, probably causing shading errors. For example to add tread around a tire, the tread can be baked from a tread model that is laid out flat, then that bake can layered onto the bake from the cylindrical tire mesh in a paint program.

Adjust the model topology to avoid distortion, from the Polycount Forum thread Understanding averaged normals and ray projection/Who put waviness in my normal map?.
Image by Joe "EarthQuake" Wilson

Baking Tools
- Recommended software for baking normals/ambient occlusion maps? Polycount Forum thread.
- 3ds Max: Render To Texture
- Airborn Studios Tools - Backstube (Xnormal batcher), Packstube (map packer).
- Blender: Render Bake
- Explode Tools for exploded bakes.
- Handplane for tangent space conversion.
- Knald
- Maya: Transfer Maps
- MightyBake
- Modo: Baking
- Substance Designer: Bakers
- Xnormal
- Zbrush: Create Normal Map