Texture Baking
Texture baking is the process of transferring details from one model to another.
This is commonly used to create Normal maps, by rendering the surface curvature from a high-resolution 3d model onto a lower-resolution in-game model.
Various software tools can be used for baking: 3ds Max's Render To Texture, Maya's Transfer Attributes, Xnormal, etc.
The baking tool usually starts by projecting a certain numerical distance out from the low-poly mesh, then sending rays inwards towards the high-poly mesh. When a ray intersects the high-poly mesh, it records the mesh's surface detail and saves that into a texture map.
Contents
Baking Workflow
Baking can be very slow to process if the models are complex, or the options are set to high values.
To get an understanding of how all the options affect your bake, it helps to do some test bakes on simple meshes like boxes. These generate quickly so you can experiment with all the options. This helps you learn the settings that really matter.
Triangulation
Before baking, it is usually best to triangulate the low-poly model, converting it from polygons into pure triangles. This prevents the vertex normals from being changed later on, which can create specular artifacts.
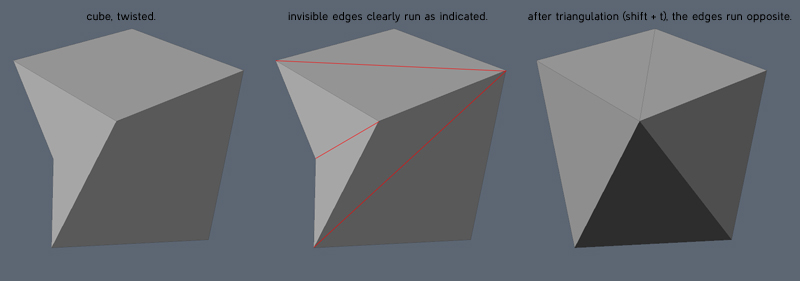
Image by "Talon" O'Hare
Sometimes a baking tool or a mesh exporter/importer will re-triangulate the polygons. A quad polygon is actually treated as two triangles, and the internal edge between them is often switched diagonally during modeling operations. When the vertices of the quad are moved around in certain shapes, the software's algorithm for polygon models tries to keep the quad surface in a "rational" non-overlapping shape. It does this by switching the internal edge between its triangles.

Image by Robert "TychoVII" Kreps
Cages
Cage has two meanings in the normal-mapping process: a low-poly base for subdivision surface modeling (usually called the basemesh), or a ray-casting mesh used for normal map baking. This section covers the ray-casting cage.
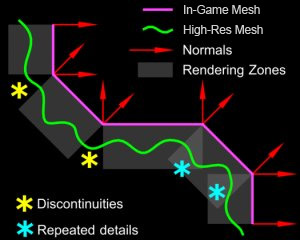
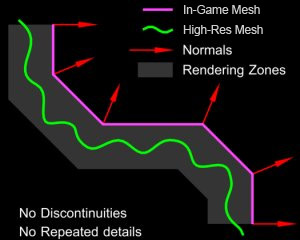
Most normal map baking tools allow you to use a distance-based raycast. A ray is sent outwards along each vertex normal, then at the distance you set a ray is cast back inwards. Where ever that ray intersects the high poly mesh, it will sample the normals from it.
|
|
| Hard edges and a distance-based raycast (gray areas) cause ray misses (yellow) and ray overlaps (cyan). Image by Diego Castaño |
The gray area shows that using all soft edges (or hard edges and a cage-based raycast) will avoid ray-casting errors from split normals. Image by Diego Castaño |
Unfortunately with a distance-based raycast, split vertex normals will cause the bake to miss parts of the high-res mesh, causing errors and seams.
Some software allows you to use cage mesh option instead, which basically inflates a copy of the low-poly mesh, then raycasts inwards from each vertex. This ballooned-out mesh is the cage.
In 3ds Max the cage controls both the distance and the direction of the raycasting.
In Maya the cage only controls the distance; the ray direction matches the vertex normals (inverted).
This may have been fixed in the latest release...<
>
In Xnormal the cage is split everywhere the model has hard edges, causing ray misses in the bake. You can fix the hard edge split problem but it involves an overly complex workflow. You must also repeat the whole process any time you change your mesh:
-
Load the 3d viewer. -
Turn on the cage editing tools. -
Select all of the vertices. -
Weld all vertices. -
Expand the cage as you normally would. -
Save out your mesh using the Xnormal format. -
Make sure Xnormal is loading the correct mesh.
- The tutorial Modeling High/Low Poly Models for Next Gen Games by João "Masakari" Costa has more examples of ray-casting, plus how to get better results from the bake.
Anti-Aliasing
Turning on super-sampling or anti-aliasing (or whatever multi-ray casting is called in your normal map baking tool) will help to fix any jagged edges where the high-res model overlaps itself within the UV borders of the low-poly mesh, or wherever the background shows through holes in the mesh. Unfortunately this tends to render much much slower, and takes more memory.

Image by 'knak47'
One trick to speed this up is to render 2x the intended image size then scale the normal map down 1/2 in a paint program like Photoshop. The reduction's pixel resampling will add anti-aliasing for you in a very quick process. After scaling, make sure to re-normalize the map if your game doesn't do that already, because the un-normalized pixels in your normalmap may cause pixelly artifacts in your specular highlights. Re-normalizing can be done with NVIDIA's normal map filter for Photoshop.
3ds Max's supersampling doesn't work nicely with edge padding, it produces dark streaks in the padded pixels. If so then turn off padding and re-do the padding later, either by re-baking without supersampling or by using a Photoshop filter like the one that comes with Xnormal.
Transparency
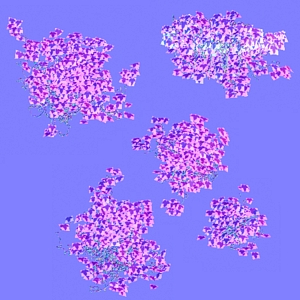
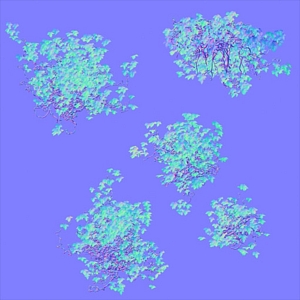
Sometimes you need to bake a normal map from an object that uses opacity maps, like a branch with opacity-mapped leaves. Unfortunately baking apps often completely ignore any transparency mapping on your high-poly mesh.
|
|
| 3ds Max's RTT baker causes transparency errors. image by Joe "EarthQuake" Wilson |
The lighting method bakes perfect transparency. image by Joe "EarthQuake" Wilson |
To solve this, render a Top view of the mesh. This only works if you're using a planar UV projection for your low-poly mesh and you're baking a tangent-space normal map.
- Make sure the Top view matches the dimensions of the planar UV projection used by the low-poly mesh. It helps to use an orthographic camera for precise placement.
- On the high-poly mesh either use a specific lighting setup or a use special material shader:
- 1) The lighting setup is described in these tutorials:
- * Creating A Normal Map Right In Your 3D App by Ben Cloward
- *Generating High Fidelity Normal Maps with 3-D Software by Dave McCoy, Graphics Techniques Consultant, Xbox Content and Design Team
- 2) The material shader does the same thing, but doesn't require lights.
- * NormalTexMap scripted map for 3ds Max by Dave Locke.
- * InfoTexture map plugin for 3ds Max by John Burnett
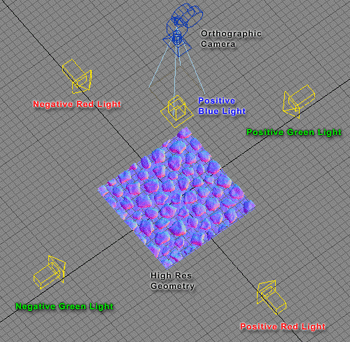
Image by Ben Cloward
Edge Padding
If a normal map doesn't have enough Edge Padding, this will create shading seams on the UV borders.
High Poly Materials
3ds Max will not bake a normal map properly if the high-res model has a mental ray Arch & Design material applied. If your normal map comes out mostly blank, either use a Standard material or none at all. For an example see the Polycount thread Render to Texture >:O.
Reset Transforms
Before baking, make sure your low-poly model's transforms have been reset. This is very important! Often during the modeling process a model will be rotated and scaled, but these compounded transforms can create a messy local "space" for the model, which in turn often creates rendering errors for normal maps.
In 3ds Max, use the Reset Xforms utility then Collapse the Modifier Stack. In Maya use Freeze Transformation. In XSI use the Freeze button.
Solving Intersections
The projection process often causes problems like misses, or overlaps, or intersections. It can be difficult generating a clean normal map in areas where the high-poly mesh intersects or nearly intersects itself, like in between the fingers of a hand. Setting the ray distance too large will make the baker pick the other finger as the source normal, while setting the ray distance too small will lead to problems at other places on the mesh where the distances between in-game mesh and high-poly mesh are greater.
Fortunately there are several methods for solving these problems.
- Change the shape of the cage. Manually edit points on the projection cage to help solve tight bits like the gaps between fingers.
- Limit the projection to matching materials, or matching UVs.
- Explode the meshes. See the polycount thread Explode script needed (for baking purposes).
- Bake two or more times using different cage sizes, and combine them in Photoshop.
Solving Pixel Artifacts
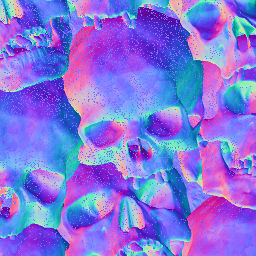
Image by Eric Chadwick
If you are using 3ds Max's Render To Texture to bake from one UV layout to another, you may see stray pixels scattered across the bake. This only happens if you are using a copy of the original mesh in the Projection, and that mesh is using a different UV channel than the original mesh.
There are two solutions for this:
- Add a Push modifier to the copied mesh, and set it to a low value like 0.01.
- or -
- Turn off Filter Maps in the render settings (Rendering menu > Render Setup > Renderer tab > uncheck Filter Maps). To prevent aliasing you may want to enable the Global Supersampler in Render Setup.
See also #Anti-Aliasing.
Solving Wavy Lines
When capturing from a cylindrical shape, often the differences between the low-poly mesh and the high-poly mesh will create a wavy edge in the normal map. There are a couple ways to avoid this:
- The best way... create your lowpoly model with better supporting edges. See the Polycount threads Understanding averaged normals and ray projection/Who put waviness in my normal map?, approach to techy stuff, Any tips for normal mapping curved surface?.
- Adjust the shape of the cage to influence the directions the rays will be cast. Beware... this work will have to be re-done every time you edit the lowpoly mesh, as the cage will be invalidated. At the bottom of this page of his normal map tutorial, Ben "poopinmymouth" Mathis shows how to do this in 3ds Max. Same method can be seen in the image below.
- Subdivide the low-res mesh so it more closely matches the high-res mesh. Beware... this will cause the normal map not to match your lowpoly vertex normals, probably causing shading errors. Jeff "airbrush" Ross has a video tutorial that shows how to do this in Maya.
- Paint out the wavy line. Beware... this work will have to be re-done every time you re-bake the normal map. The normal map process tutorial by Ben "poopinmymouth" Mathis includes an example of painting out wavy lines in a baked normal map.
- Use a separate planar-projected mesh for the details that wrap around the barrel area, so the ray-casting is more even. Beware... this will cause the normal map not to match your lowpoly vertex normals, probably causing shading errors. For example to add tread around a tire, the tread can be baked from a tread model that is laid out flat, then that bake can layered onto the bake from the cylindrical tire mesh in a paint program.
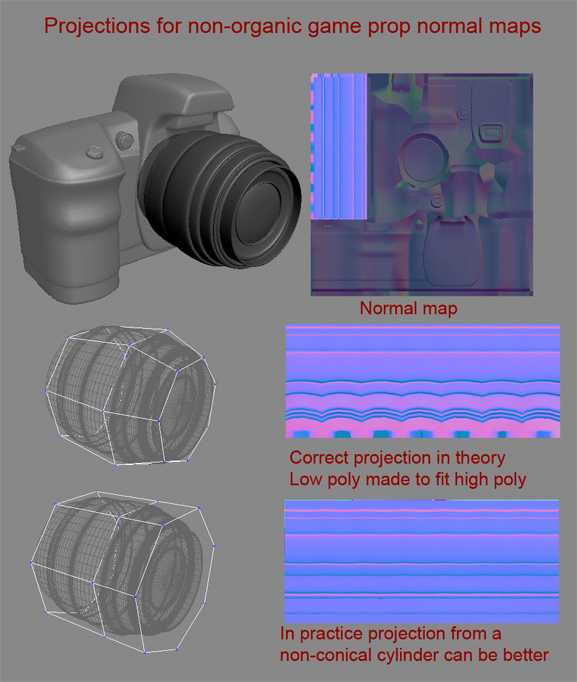
Image by Timothy "tpe" Evison